 "
"
I have been looking for a guide how to create a BGP to my oracle cloud as I was using Static Routing before, after figuring out how to do it myself I decided to make a guide for anyone who needs it also.
If you have any questions let me know😊
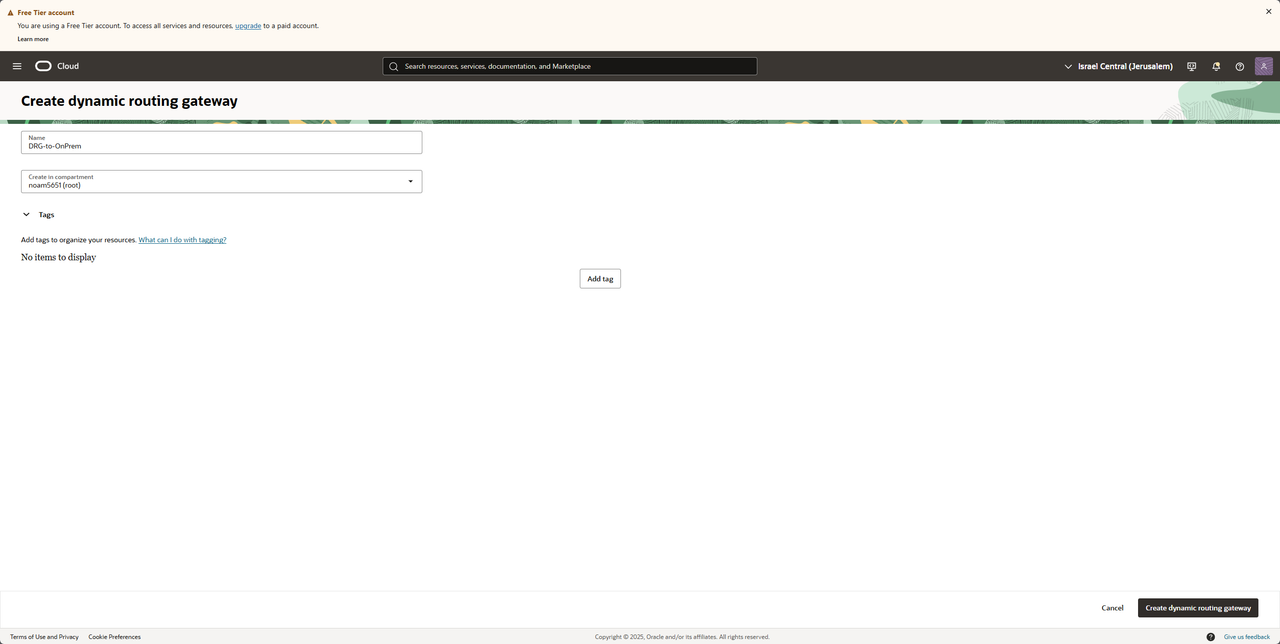
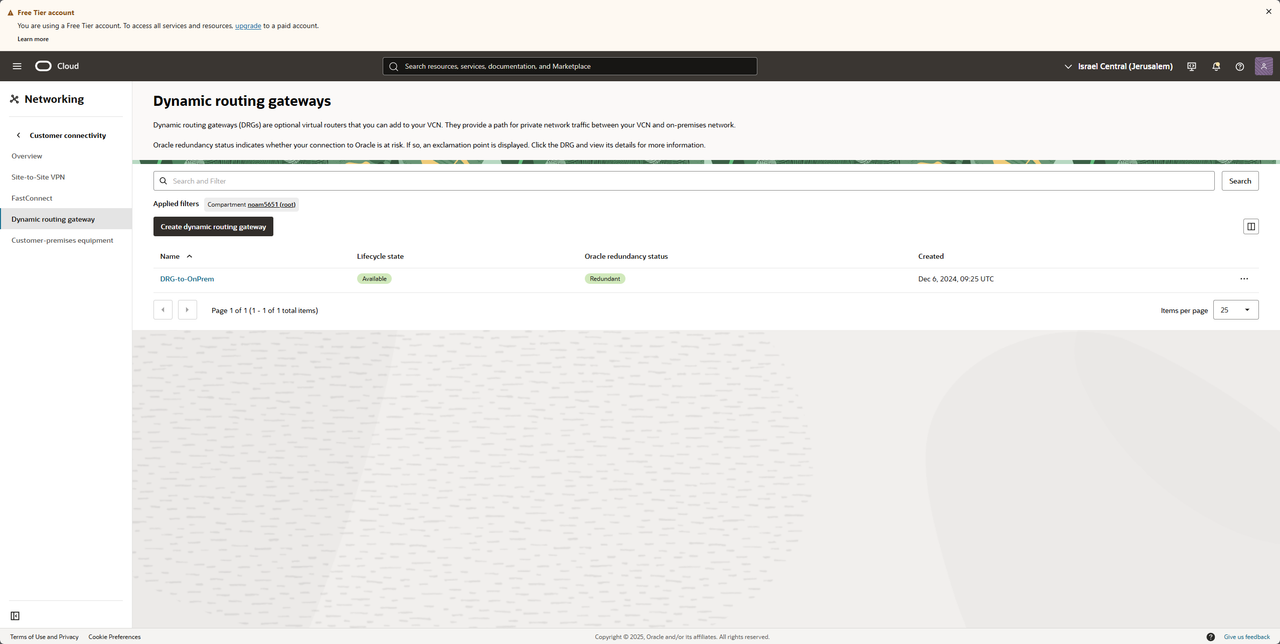
Creating the DRG
Enter OCI and search for DRG and then press on "Create dynamic routing gateway"
We should see a new DRG being provisioned
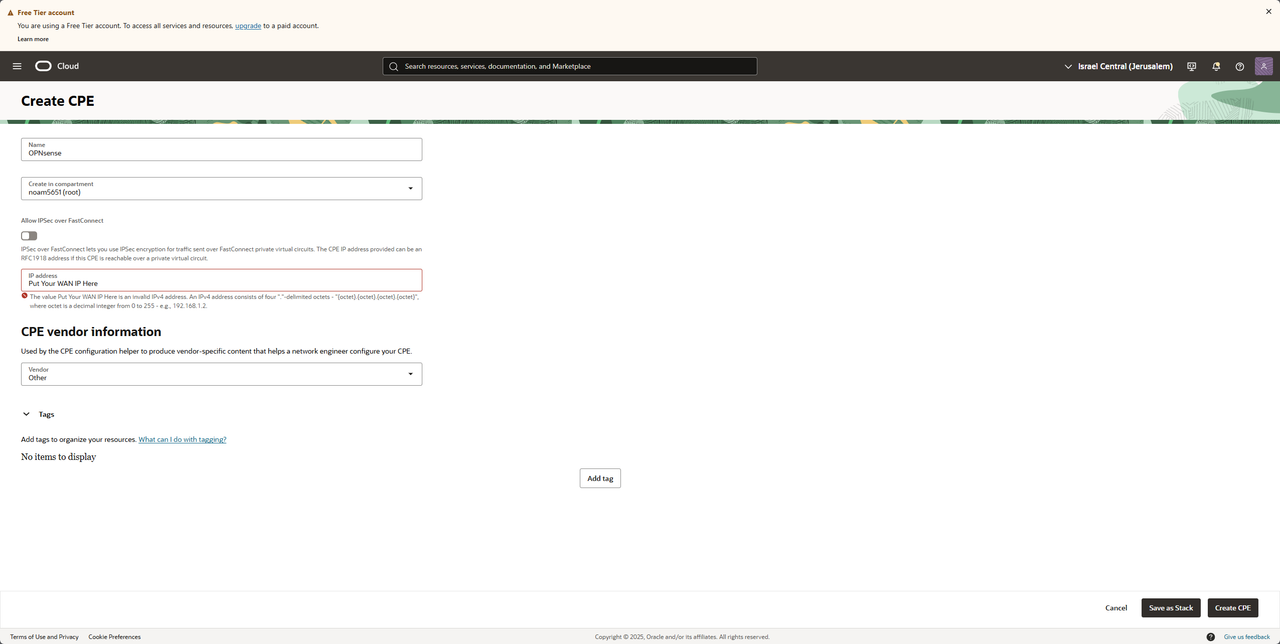
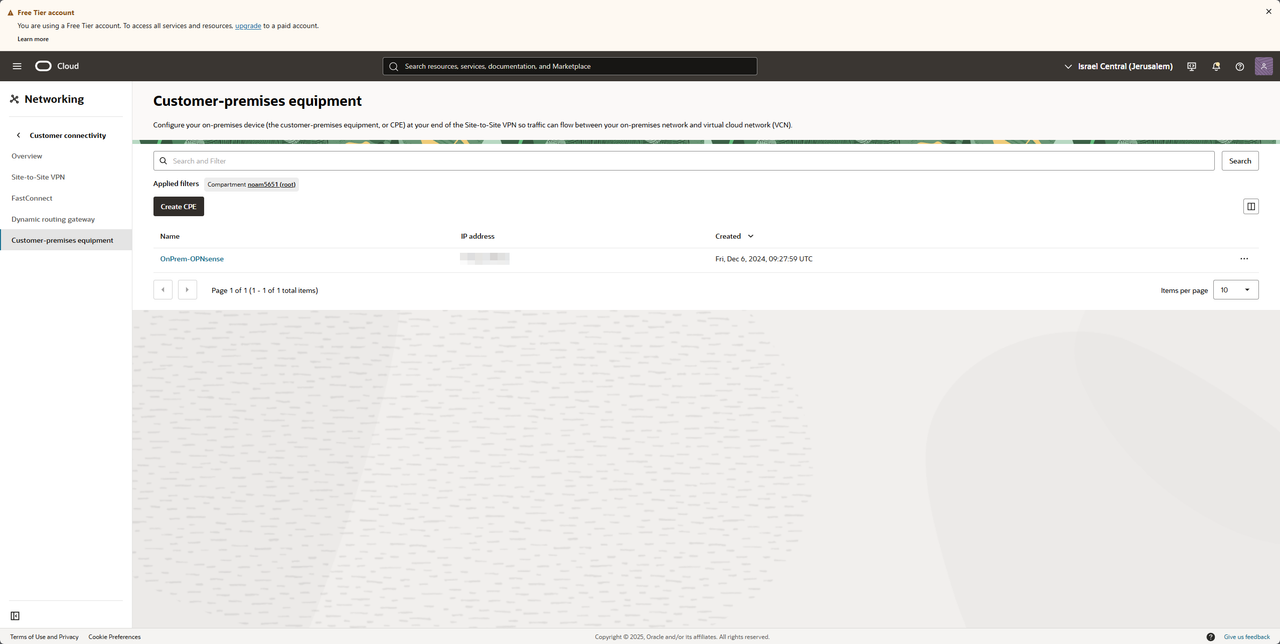
Creating a CPE
In the navbar under "Create dynamic routing gateway" we have "Customer-premises equipment"
After saving we should see our new CPE with our WAN IP
Creating BGP IPSec connection (OCI)
In the navbar we have "Site-to-Site VPN", Press on "Start VPN wizard" (We should save sometime with that, but you can do it without the wizard, in this guide we are going to work with the wizard).
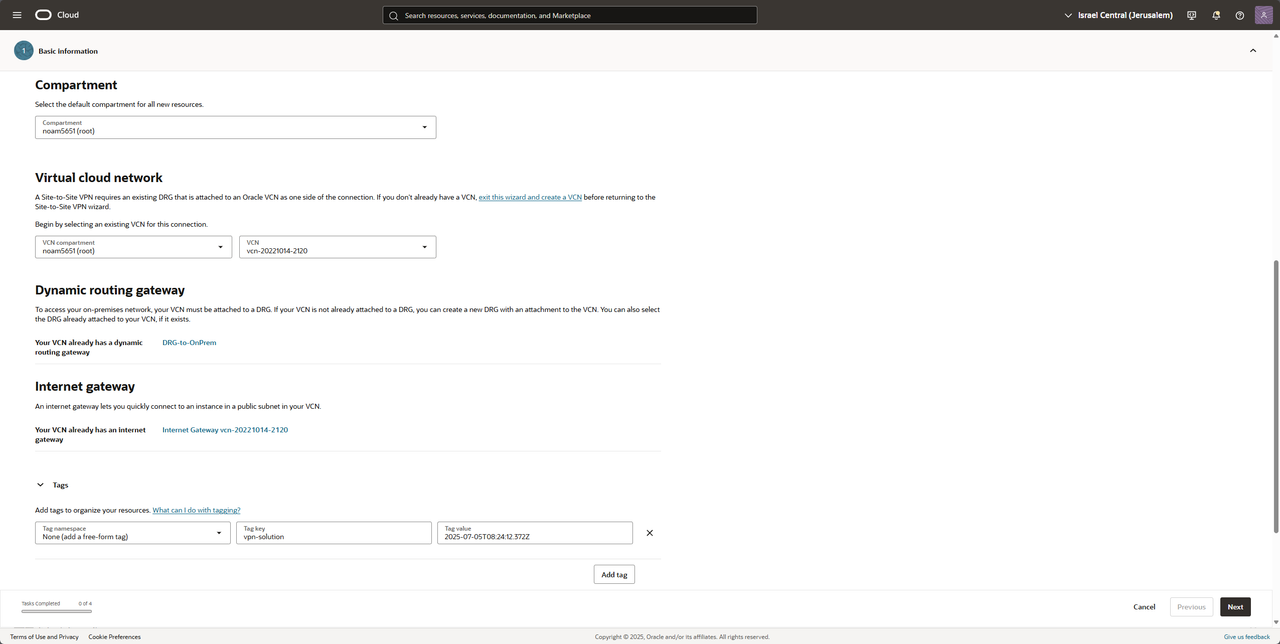
Fill your VCN and your DRG (my DRG is already attached to my VCN) and press Next
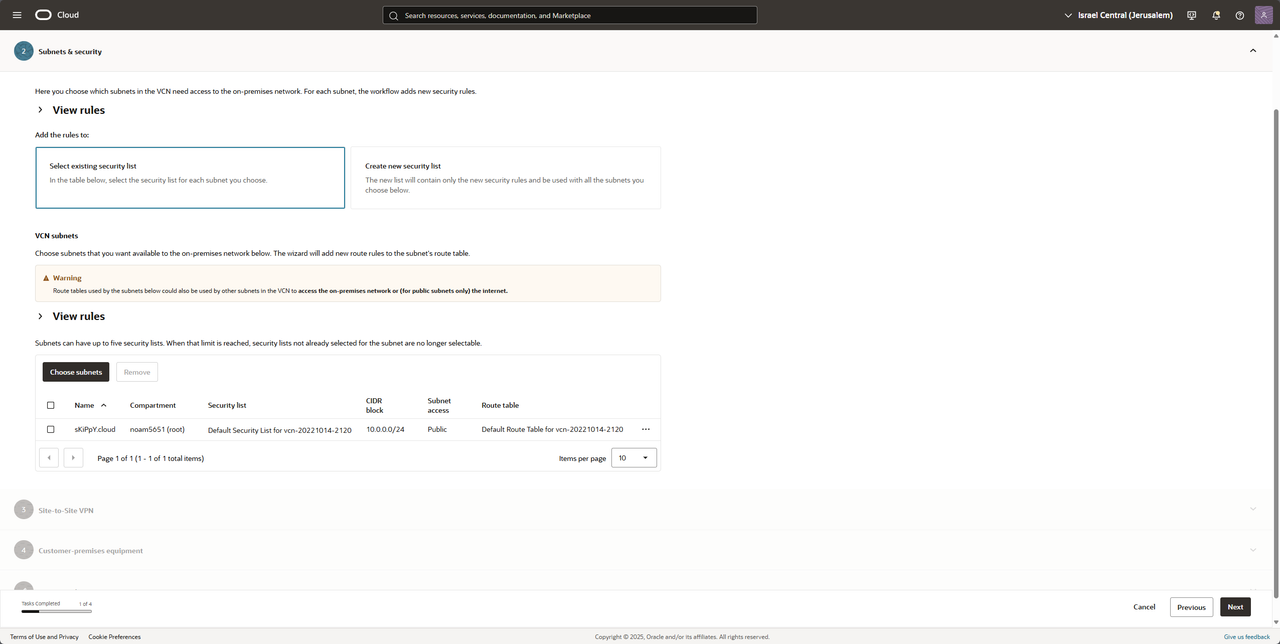
Choose your subnet you want to be advertise to your OPNsense and press Next
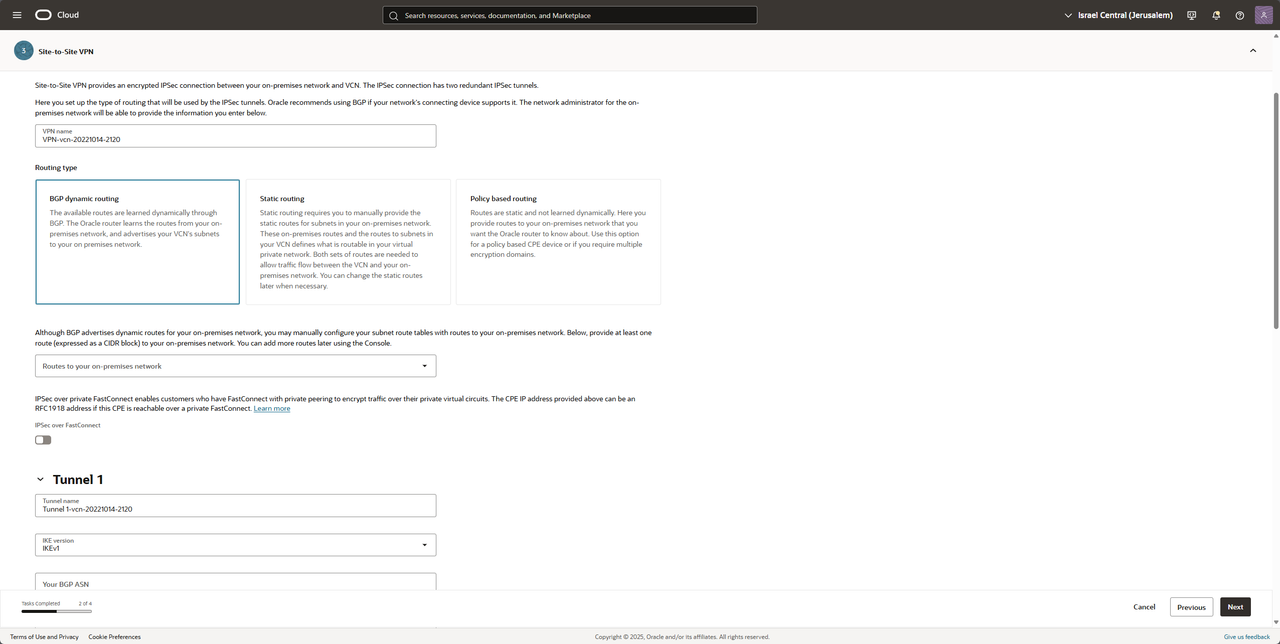
Choose a VCN name and BGP dynamic routing
*I recommend renaming the tunnel names like "BGP-Neighbor-1" and "BGP-Neighbor-2"*
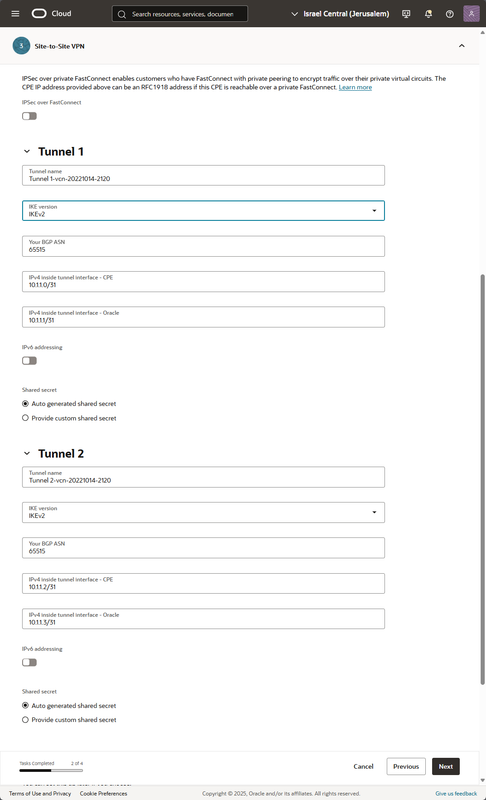
Fill the VTI IP (Virtual Tunnel Interface) like the picture (if this subnet is in use on your side choose a different subnet, here we are working with /31 to save network address) press Next
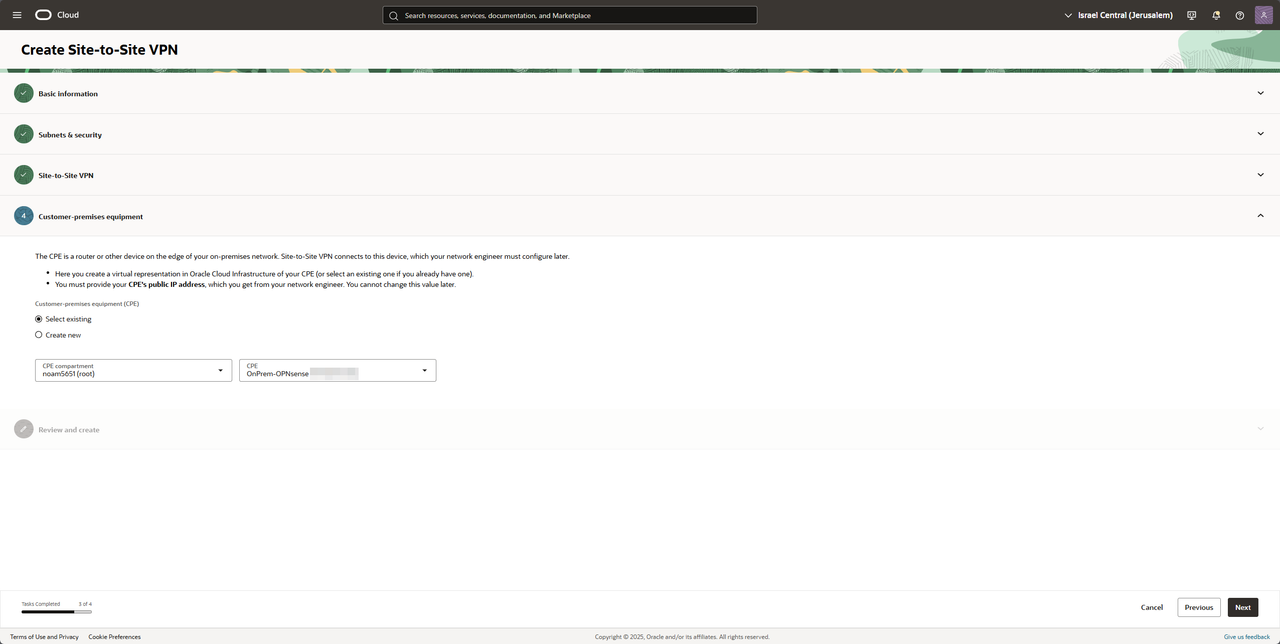
Choose your CPE and press Next
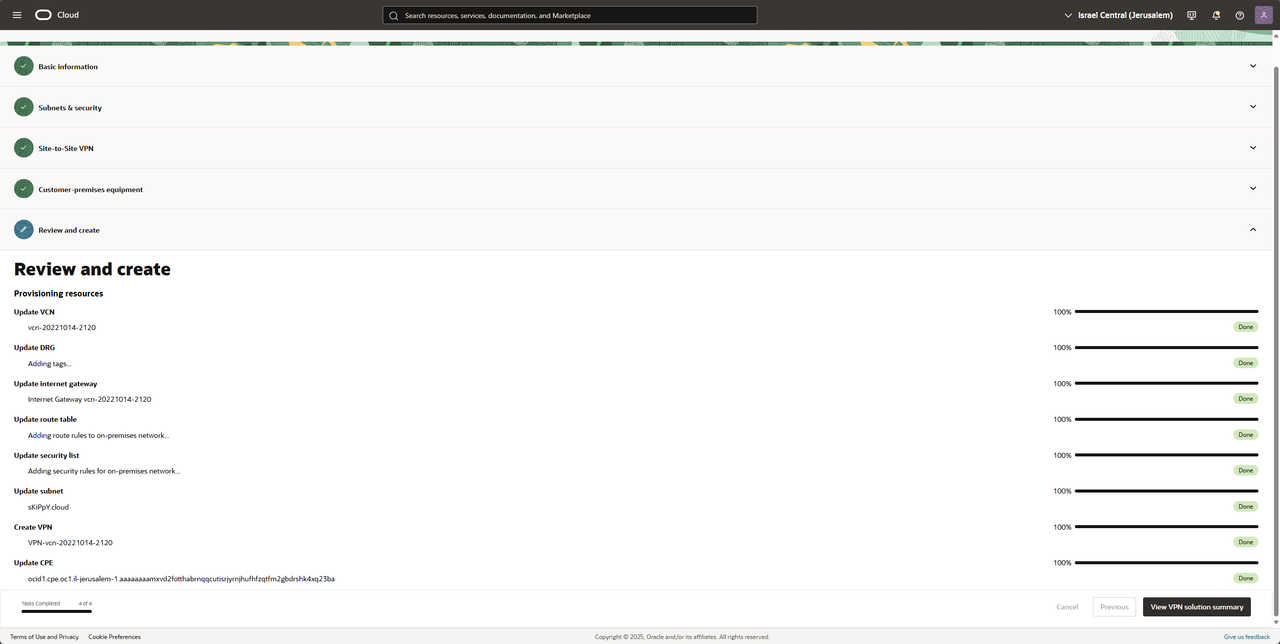
Accept the setting and wait till everything is in "Done" state and press on "View VPN solution summery" to receive the tunnel secrets and neighbor IPs
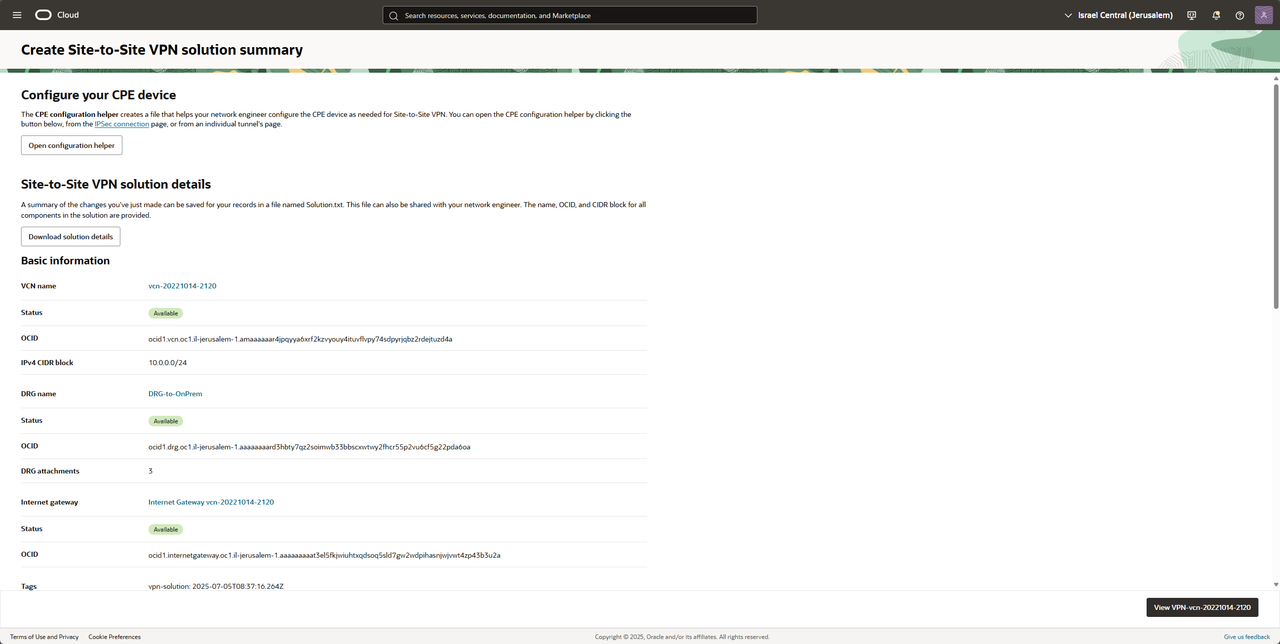
Press on Download solution details, we will get a txt file with all of our setting and we only need these two sections from the file:
Tunnel 1 name: BGP-Tunnel-1
IKE version: V2
Your BGP ASN: 65515
Oracle BGP ASN: 31898
IPv4 inside tunnel interface - CPE: 10.1.1.0/31
IPv4 inside tunnel interface - Oracle: 10.1.1.1/31
Oracle IP address: ORACLEWANIPTunnel1
Shared secret: OCISharedSecretTunnel1
Tunnel 1 name: BGP-Tunnel-2
IKE version: V2
Your BGP ASN: 65515
Oracle BGP ASN: 31898
IPv4 inside tunnel interface - CPE: 10.1.1.2/31
IPv4 inside tunnel interface - Oracle: 10.1.1.3/31
Oracle IP address: ORACLEWANIPTunnel2
Shared secret: OCISharedSecretTunnel2
Setting up the tunnel on (OPNsense)
In OPNsense go to VPN -> IPsec -> Pre-Shared Keys
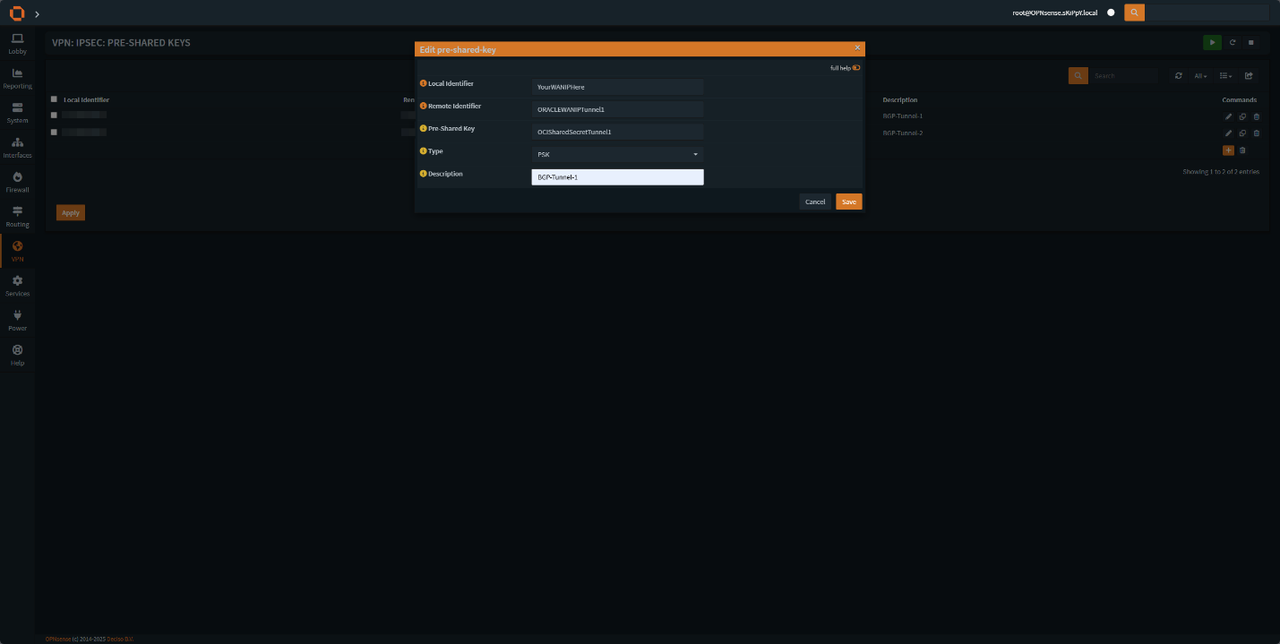
add two new keys according to the image, do it for both tunnels.
After that stay in IPsec navbar and head to "Virtual Tunnel Interfaces"
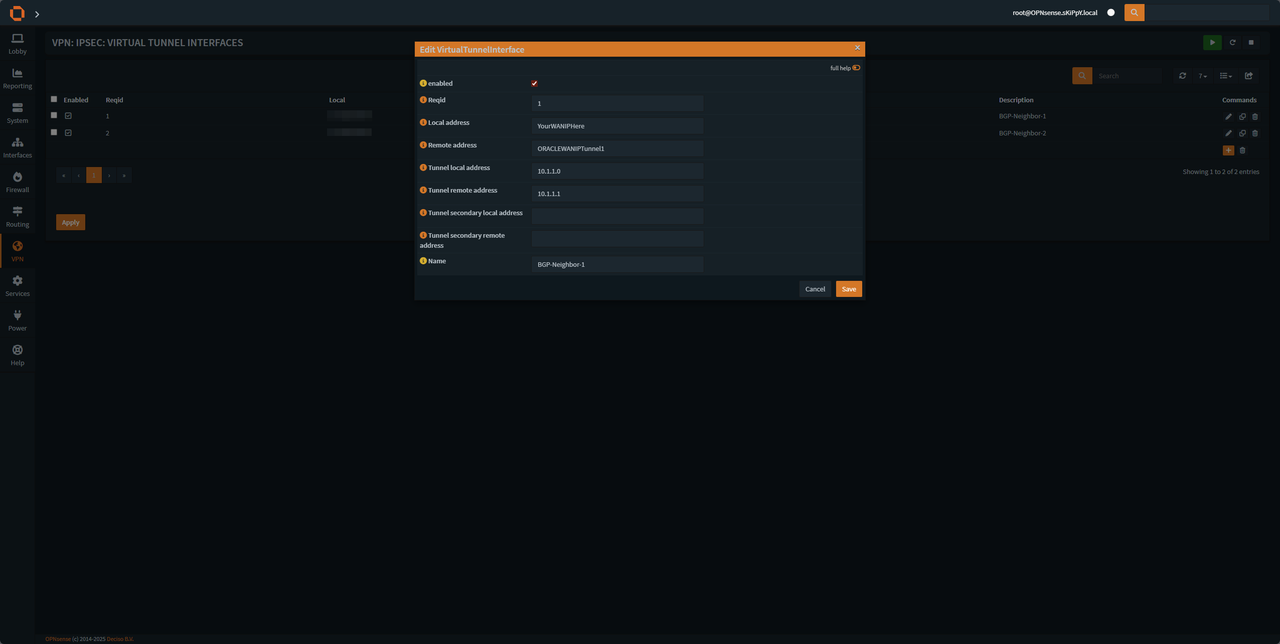
Setup both interfaces according to the image, do it for both tunnels.
make sure to change the Reqid (Tunnel 1 Reqid 1 & Tunnel 2 Reqid 2) and Tunnel interfaces Address according to the tunnel configuration on OCI txt file (CPE = Local, Oracle = Remote).
After that stay in IPsec navbar and head to "Connections"
Create a new tunnel and fill in the details according to the last steps (make sure your are in advanced mode)
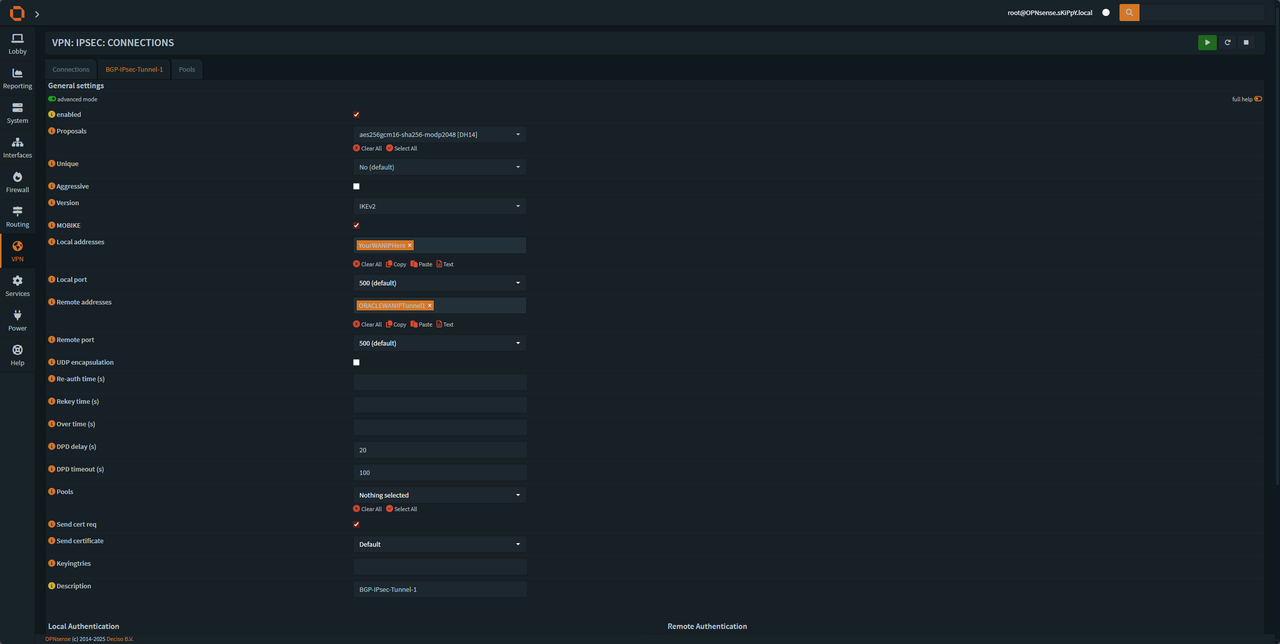
and press save, after that we will see phase 2 settings being added
we will need to add
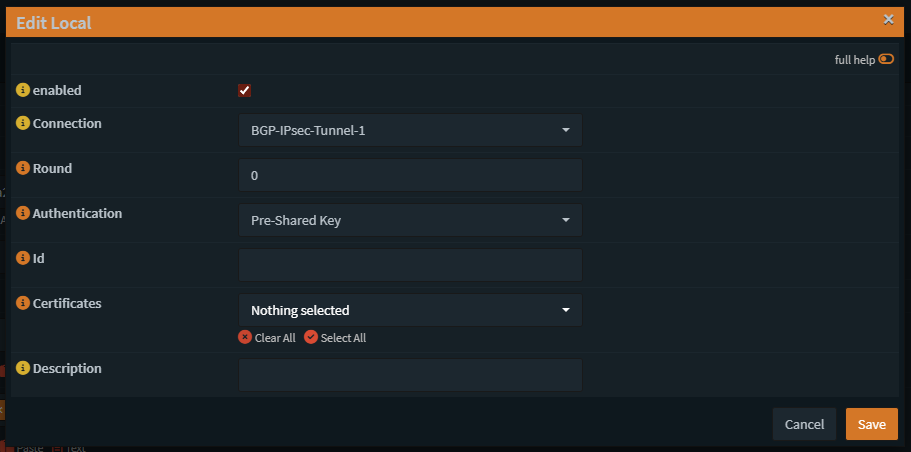
• Local Authentication
• Remote Authentication
• Children
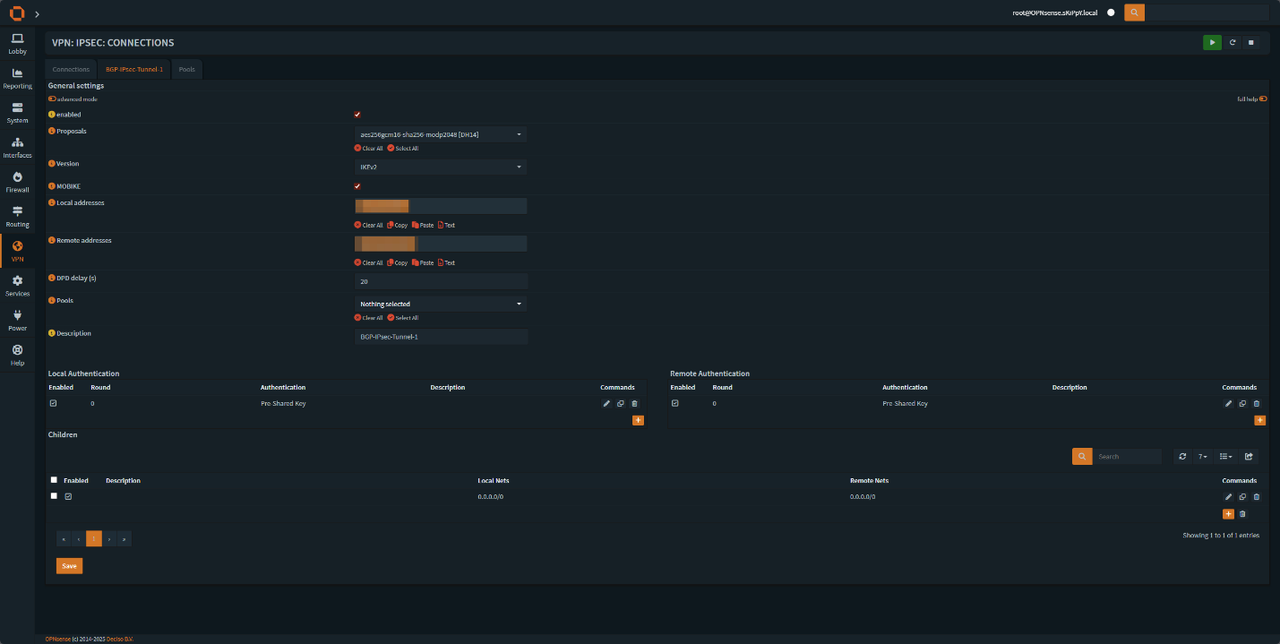
Local settings:
Remote Settings
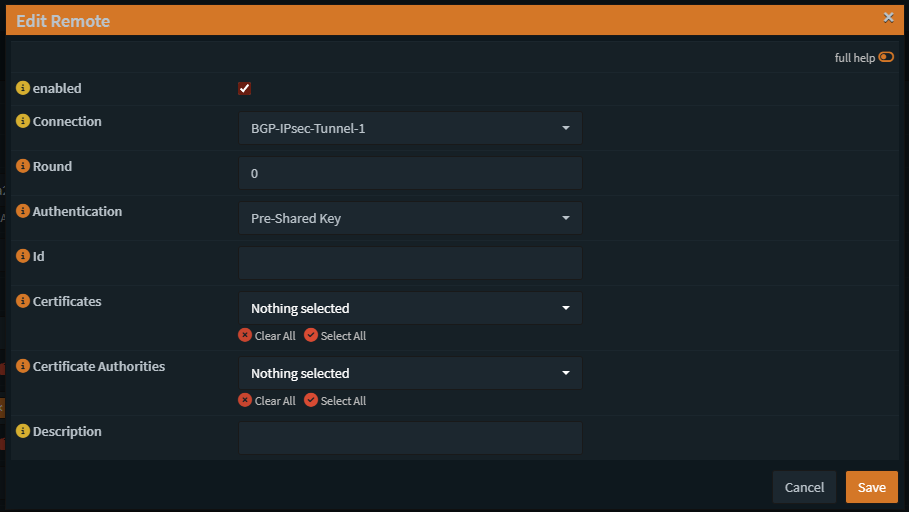
Children
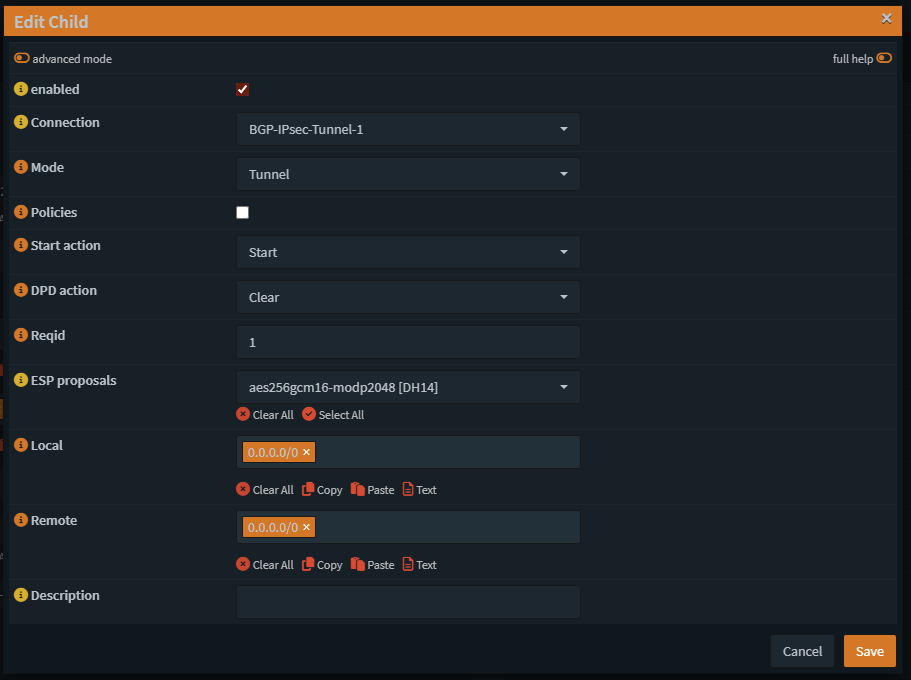
After creating the first tunnel you can clone the first tunnel and edit all of the setting that say BGP-IPsec-Tunnel-1 and apply BGP-IPsec-Tunnel-2 instead, make sure to change in phase 1 the remote oracle IP to the secondary tunnel IP, MAKE SURE YOU SET REQ-ID=2 ON TUNNEL-2.
Our tunnel should start but if it doesn't, we will need to add firewall rules.
In the firewall tab go to aliases and add a new alias for oracle tunnel IPs

Change the IPs according to your txt file.
Create an alias for ports also

After that go to Firewall Port Forward
Creating the firewall rule for ESP
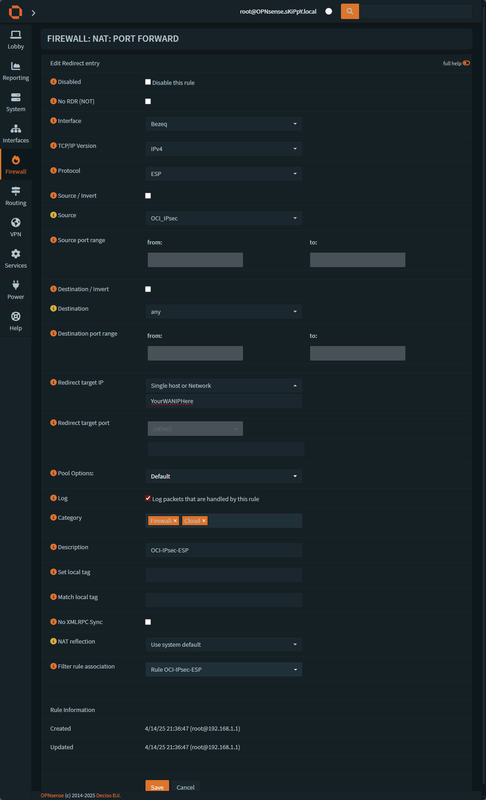
Make sure to change the protocol to ESP and save.
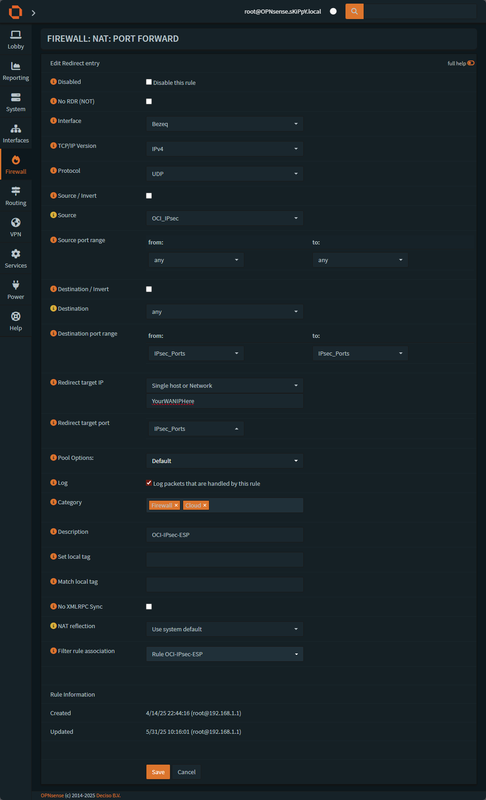
Create a second rule for IPsec ports
After that the tunnel should be up and working, we can validate the if the tunnel is up by going to VPN -> IPsec -> Status Overview
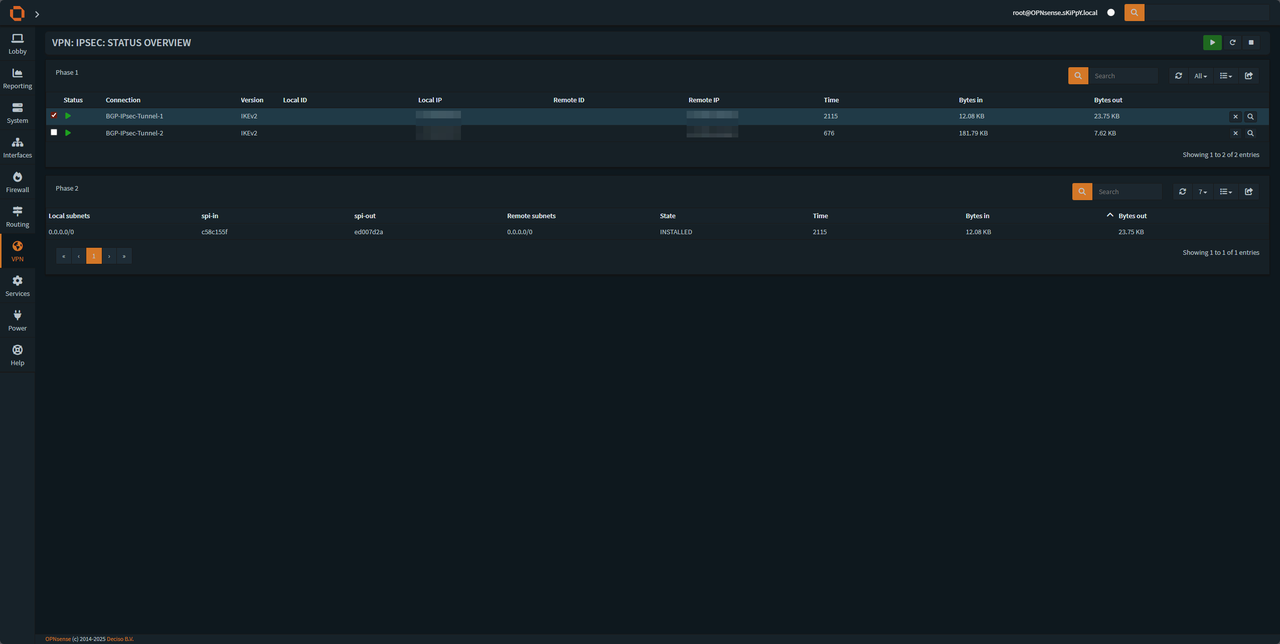
We should see that the tunnel is up and installed and we have local and remote subnets at 0.0.0.0/0 as we set.
BGP setup using frr plugin
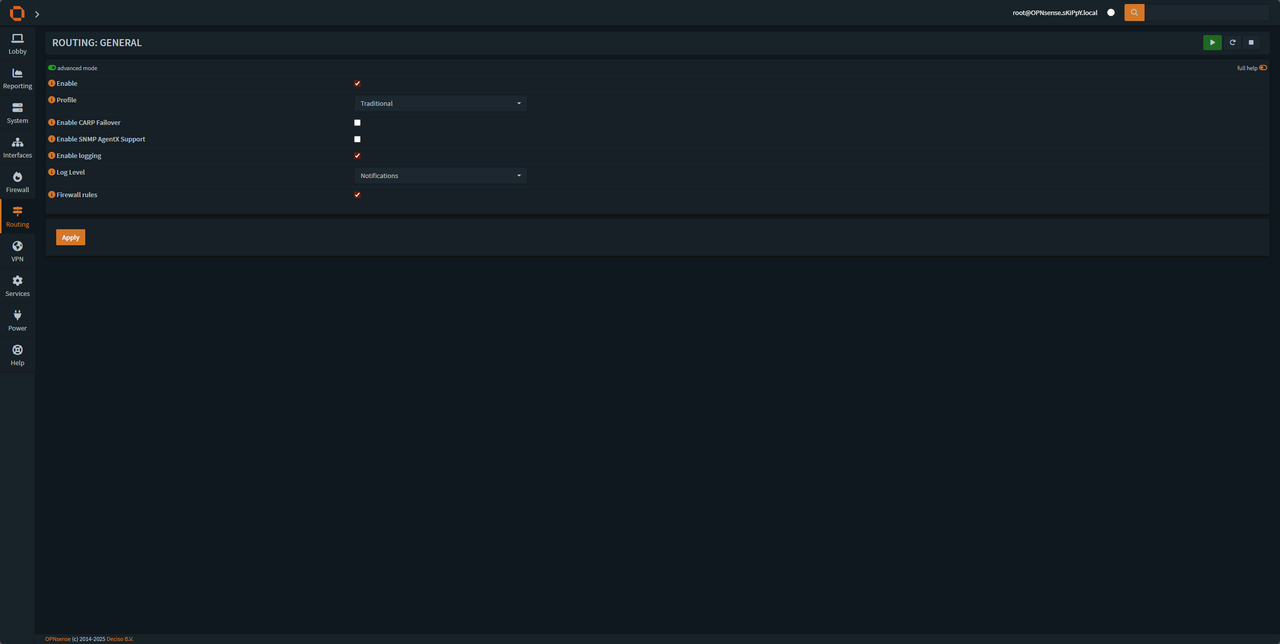
After installing "frr plugin" we will have a new tab in the navbar "Routing" press on it and go to General and enable the plugin
After we have it enable under Routing go to BGP.
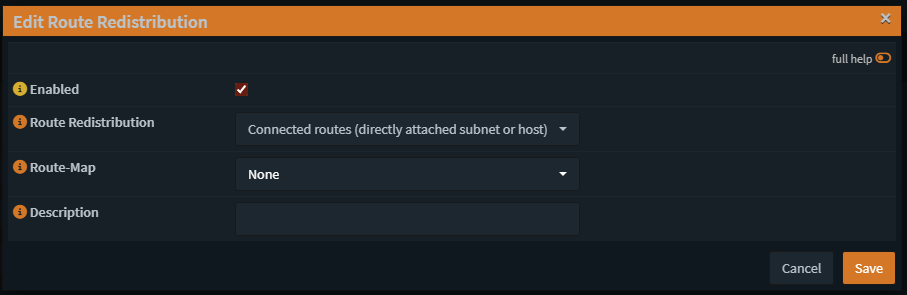
Enable the BGP and add Route redistribution: set it up according to the image
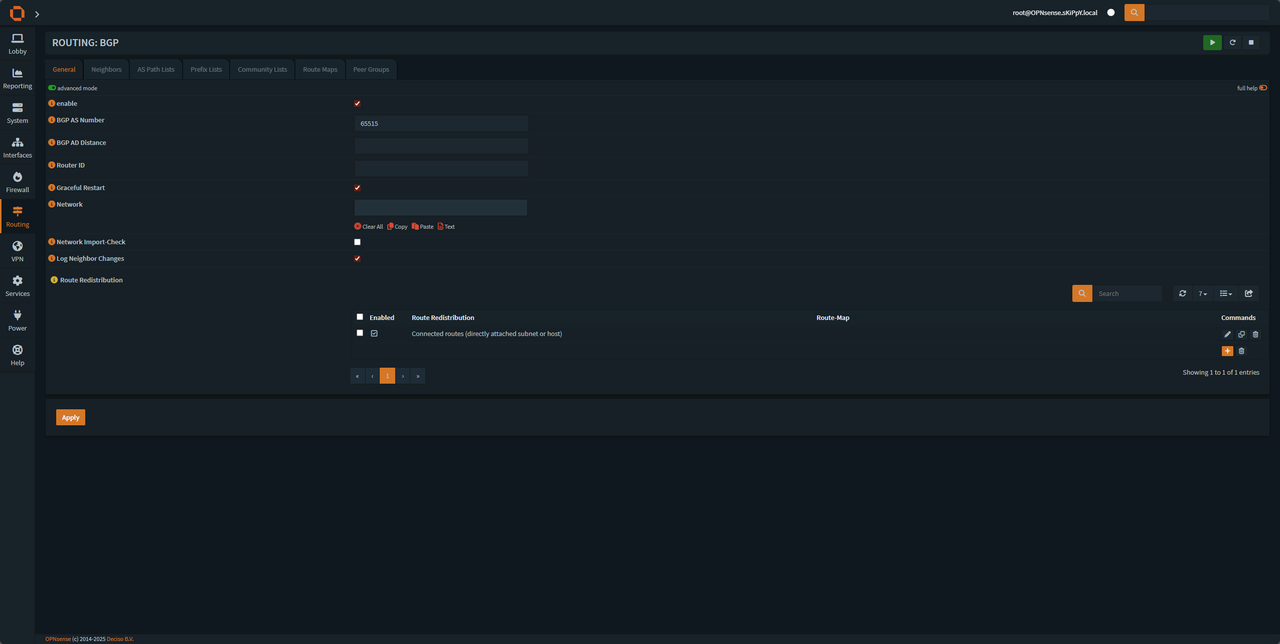
Route redistribution settings
This will allow us to advertise all connected interface to oracle (we are going to be using prefix list to prevent route leakage and monitor which networks we advertise to oracle).
Creating a prefix list to prevent the route leakage, in the frr BGP we have Prefix Lists tab
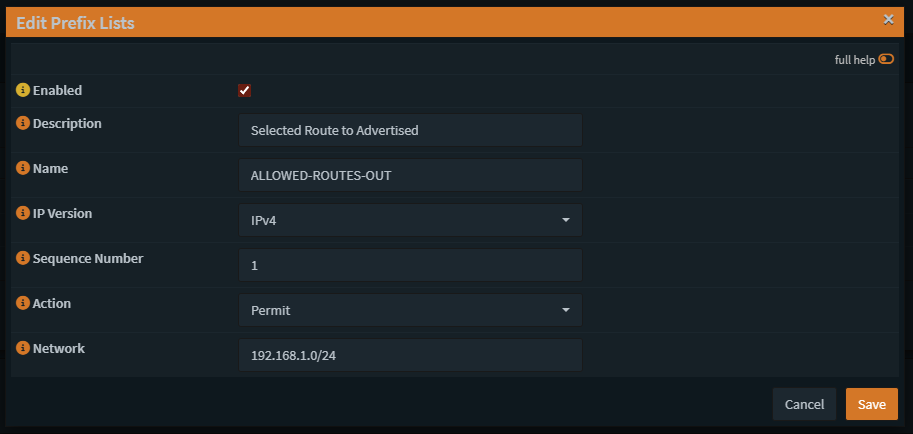
Here as we can see we allow my LAN to be advertised over the tunnel, every network you want to advertise needs to be created with the save name and different Sequence Number, if you set the same Sequence Number only the last route added will be shown so be careful with the sequences.
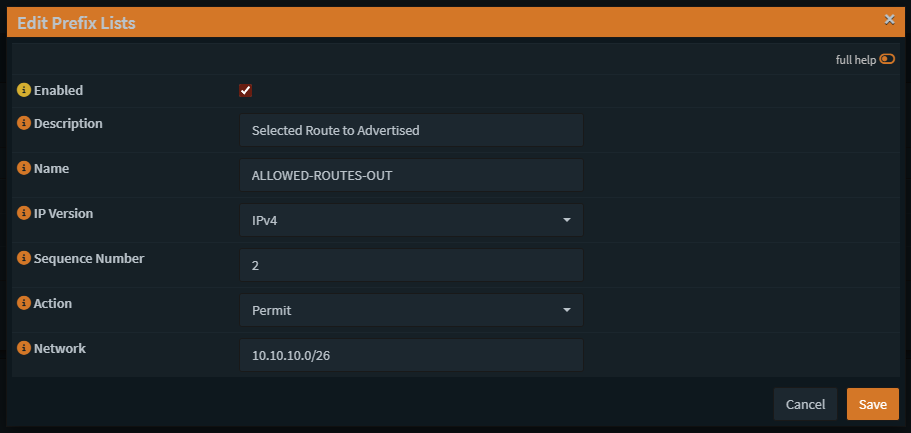
Here is a different network the I advertise for example.
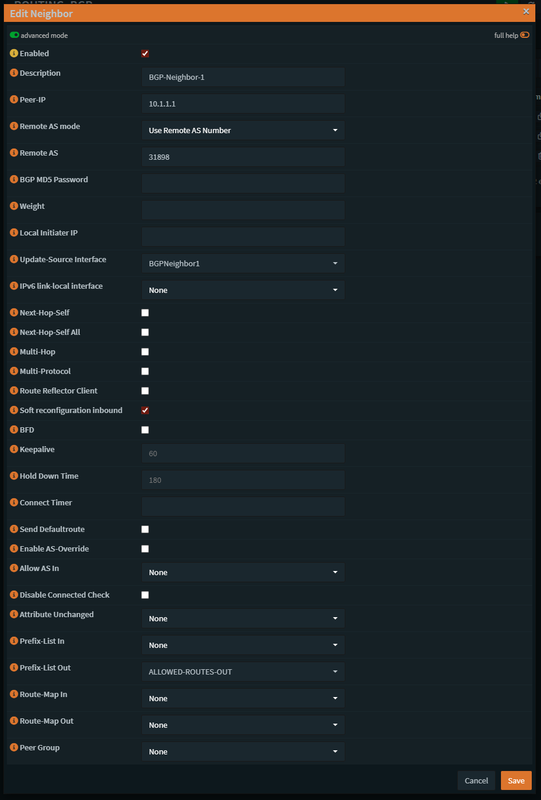
Creating the neighbors in frr bgp, if you had set everything correctly, you'll be able to set the neighbor as shown, again you'll need to clone it and change the IP address and the Update-Source Interface according to the neighbor, once again the prefix list out needs to be the same name and be set once in the neighbor configuration (Applies also to the secondary neighbor).
Now if everything is setup correctly, we'll be able to see our networks being advertised and received through the OPNsense cli, after login in we'll need to press 8 and then type vtysh
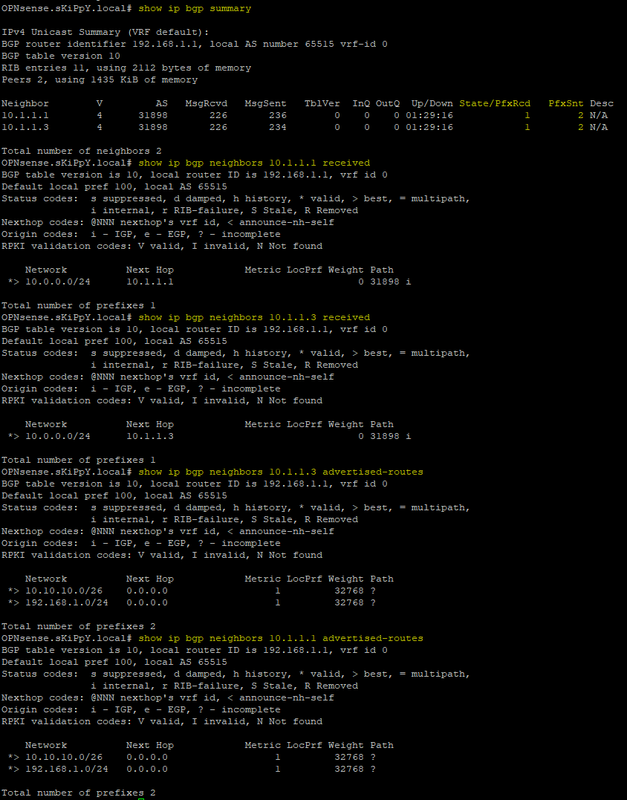
You'll be able to ping the neighbors from vtysh and receive an answer, if not you missed a step, you'll need to go and check again.
We still need to do a couple more things before we finish, we need to head into OPNsense Firewall -> Rules -> BGPNEIGHBOR1/2 and create two rules on each
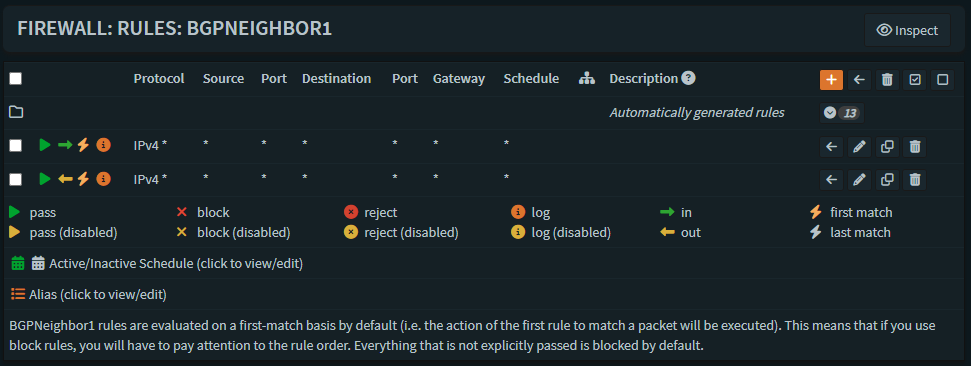
We need to allow any in and any out.
after that go to Firewall -> Rules -> IPsec
and open any rules according to your needs, IPsec interface will be the only interface that you need to open rules from OCI to OnPrem and vice versa.
I recommend creating allow ICMP for testing to see if communication is working (In & Out).
Going back to OCI
we need to allow traffic to come from our OnPrem and add routing rule so every private IP will go to our DRG-to-OnPrem.
1. Routing traffic to DRG – Search for "VCN" -> Enter your "VCN" -> Routing -> "Default Route Table for VCN" -> Route Rules, and add the following:
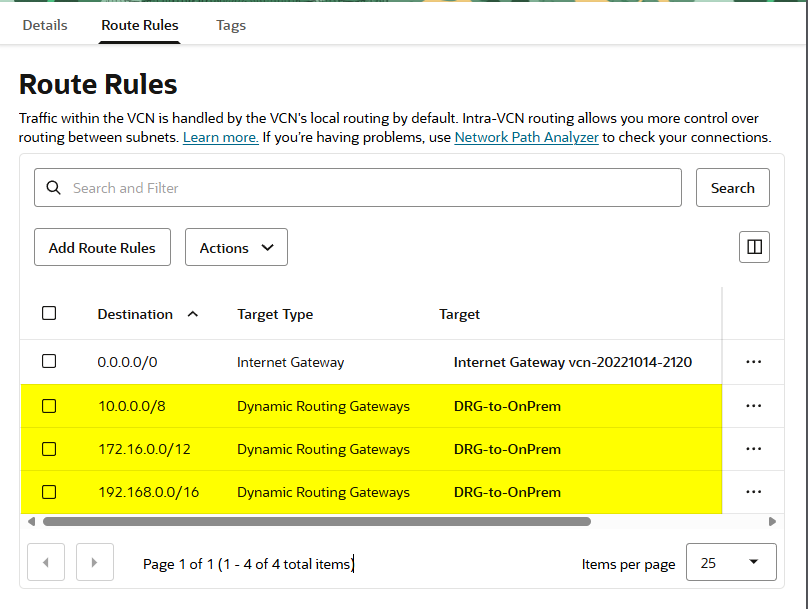
Make sure to set the target to DRG and not Internet Gateway.
2. Allowing Traffic from Local address – Go back to your "VCN" and head to Security Tab -> "Default Security List for VCN" -> Security rules, and under Ingress Rules add your OnPrem IPs / RFC 1918 IPs like set in the Routing table.

Make sure to make these two rules if you are not doing RFC1918
Enabling ECMP
For enabling ECMP (Load Balance), we need to head back to the CLI and exit vtysh (be in cli normal cli mode) and we type these commands
sysctl net.route.multipath=1
service frr restart
ifconfig ipsec1 down
ifconfig ipsec1 up
ifconfig ipsec2 down
ifconfig ipsec2 up

After this we should see both tunnels as up and traffic should be load balanced (this will need to apply after every reboot).
That's it!
If you have any questions let me know😊
Creating the DRG
Enter OCI and search for DRG and then press on "Create dynamic routing gateway"
We should see a new DRG being provisioned
Creating a CPE
In the navbar under "Create dynamic routing gateway" we have "Customer-premises equipment"
After saving we should see our new CPE with our WAN IP
Creating BGP IPSec connection (OCI)
In the navbar we have "Site-to-Site VPN", Press on "Start VPN wizard" (We should save sometime with that, but you can do it without the wizard, in this guide we are going to work with the wizard).
Fill your VCN and your DRG (my DRG is already attached to my VCN) and press Next
Choose your subnet you want to be advertise to your OPNsense and press Next
Choose a VCN name and BGP dynamic routing
*I recommend renaming the tunnel names like "BGP-Neighbor-1" and "BGP-Neighbor-2"*
Fill the VTI IP (Virtual Tunnel Interface) like the picture (if this subnet is in use on your side choose a different subnet, here we are working with /31 to save network address) press Next
Choose your CPE and press Next
Accept the setting and wait till everything is in "Done" state and press on "View VPN solution summery" to receive the tunnel secrets and neighbor IPs
Press on Download solution details, we will get a txt file with all of our setting and we only need these two sections from the file:
Tunnel 1 name: BGP-Tunnel-1
IKE version: V2
Your BGP ASN: 65515
Oracle BGP ASN: 31898
IPv4 inside tunnel interface - CPE: 10.1.1.0/31
IPv4 inside tunnel interface - Oracle: 10.1.1.1/31
Oracle IP address: ORACLEWANIPTunnel1
Shared secret: OCISharedSecretTunnel1
Tunnel 1 name: BGP-Tunnel-2
IKE version: V2
Your BGP ASN: 65515
Oracle BGP ASN: 31898
IPv4 inside tunnel interface - CPE: 10.1.1.2/31
IPv4 inside tunnel interface - Oracle: 10.1.1.3/31
Oracle IP address: ORACLEWANIPTunnel2
Shared secret: OCISharedSecretTunnel2
Setting up the tunnel on (OPNsense)
In OPNsense go to VPN -> IPsec -> Pre-Shared Keys
add two new keys according to the image, do it for both tunnels.
After that stay in IPsec navbar and head to "Virtual Tunnel Interfaces"
Setup both interfaces according to the image, do it for both tunnels.
make sure to change the Reqid (Tunnel 1 Reqid 1 & Tunnel 2 Reqid 2) and Tunnel interfaces Address according to the tunnel configuration on OCI txt file (CPE = Local, Oracle = Remote).
After that stay in IPsec navbar and head to "Connections"
Create a new tunnel and fill in the details according to the last steps (make sure your are in advanced mode)
and press save, after that we will see phase 2 settings being added
we will need to add
• Local Authentication
• Remote Authentication
• Children
Local settings:
Remote Settings
Children
After creating the first tunnel you can clone the first tunnel and edit all of the setting that say BGP-IPsec-Tunnel-1 and apply BGP-IPsec-Tunnel-2 instead, make sure to change in phase 1 the remote oracle IP to the secondary tunnel IP, MAKE SURE YOU SET REQ-ID=2 ON TUNNEL-2.
Our tunnel should start but if it doesn't, we will need to add firewall rules.
In the firewall tab go to aliases and add a new alias for oracle tunnel IPs
Change the IPs according to your txt file.
Create an alias for ports also
After that go to Firewall Port Forward
Creating the firewall rule for ESP
Make sure to change the protocol to ESP and save.
Create a second rule for IPsec ports
After that the tunnel should be up and working, we can validate the if the tunnel is up by going to VPN -> IPsec -> Status Overview
We should see that the tunnel is up and installed and we have local and remote subnets at 0.0.0.0/0 as we set.
BGP setup using frr plugin
After installing "frr plugin" we will have a new tab in the navbar "Routing" press on it and go to General and enable the plugin
After we have it enable under Routing go to BGP.
Enable the BGP and add Route redistribution: set it up according to the image
Route redistribution settings
This will allow us to advertise all connected interface to oracle (we are going to be using prefix list to prevent route leakage and monitor which networks we advertise to oracle).
Creating a prefix list to prevent the route leakage, in the frr BGP we have Prefix Lists tab
Here as we can see we allow my LAN to be advertised over the tunnel, every network you want to advertise needs to be created with the save name and different Sequence Number, if you set the same Sequence Number only the last route added will be shown so be careful with the sequences.
Here is a different network the I advertise for example.
Creating the neighbors in frr bgp, if you had set everything correctly, you'll be able to set the neighbor as shown, again you'll need to clone it and change the IP address and the Update-Source Interface according to the neighbor, once again the prefix list out needs to be the same name and be set once in the neighbor configuration (Applies also to the secondary neighbor).
Now if everything is setup correctly, we'll be able to see our networks being advertised and received through the OPNsense cli, after login in we'll need to press 8 and then type vtysh
You'll be able to ping the neighbors from vtysh and receive an answer, if not you missed a step, you'll need to go and check again.
We still need to do a couple more things before we finish, we need to head into OPNsense Firewall -> Rules -> BGPNEIGHBOR1/2 and create two rules on each
We need to allow any in and any out.
after that go to Firewall -> Rules -> IPsec
and open any rules according to your needs, IPsec interface will be the only interface that you need to open rules from OCI to OnPrem and vice versa.
I recommend creating allow ICMP for testing to see if communication is working (In & Out).
Going back to OCI
we need to allow traffic to come from our OnPrem and add routing rule so every private IP will go to our DRG-to-OnPrem.
1. Routing traffic to DRG – Search for "VCN" -> Enter your "VCN" -> Routing -> "Default Route Table for VCN" -> Route Rules, and add the following:
Make sure to set the target to DRG and not Internet Gateway.
2. Allowing Traffic from Local address – Go back to your "VCN" and head to Security Tab -> "Default Security List for VCN" -> Security rules, and under Ingress Rules add your OnPrem IPs / RFC 1918 IPs like set in the Routing table.
Make sure to make these two rules if you are not doing RFC1918
Enabling ECMP
For enabling ECMP (Load Balance), we need to head back to the CLI and exit vtysh (be in cli normal cli mode) and we type these commands
sysctl net.route.multipath=1
service frr restart
ifconfig ipsec1 down
ifconfig ipsec1 up
ifconfig ipsec2 down
ifconfig ipsec2 up
After this we should see both tunnels as up and traffic should be load balanced (this will need to apply after every reboot).
That's it!

