

1
Tutorials and FAQs / TUTORIAL Nginx + Let's Encrypt for Plex / Emby / Jellyfin 100% A+ Rating
« on: September 16, 2021, 04:57:41 pm »
Here a tutorial for Nginx Proxy hosted under OPNsense with Let's Encrypt certificate
Primary testet for Plex / Emby / Jellyfin (or other services)
September 2021
Part 1 - WebGUI config
Go to System -> Settings -> Administration
TCP port: 8443 (change to what you want. don't use 80 or 443!)
HTTP Redirect: [X] Disable web GUI redirect rule (important!)

Part 2 - Install plugins
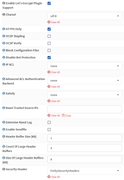
Go to System -> Firmware -> Plugins
Install plugins:
os-nginx
os-acme-client
Part 3 - Create Let's Encrypt certificate
1. Go to Services -> ACME Client -> Settings -> Settings
Enable Plugin [X]
Auto Renewal [X]
HAProxy Integration [ ]
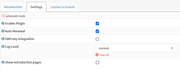
2. Go to Services -> ACME Client -> Settings -> Update Schedule
Minutes: 45
Hours: 5
Days of the week: 1
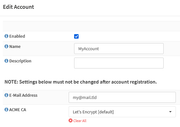
3. Go to Services -> ACME Client -> Accounts
Create a new Account
Name: MyAccount (what you want)
E-Mail Address: my@mail.tld (your mail address)
ACME CA: Let's Encrypt [default]
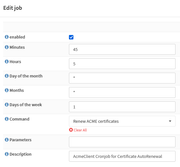
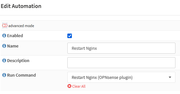
4. Go to Services -> ACME Client -> Automations
Create a new Automations
Name: Restart Nginx
Run Command: Restart Nginx (OPNsense plugin)
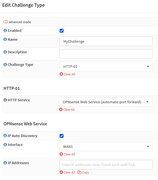
5. Go to Services -> ACME Client -> Challenge Types
Create a new Challenge Type
Name: MyChallenge
Challenge Type: HTTP-01
Or use "DNS-01" if you need DynDNS service
HTTP Service: OPNsense Web Service
IP Auto-Discovery [X]
Interface: WAN
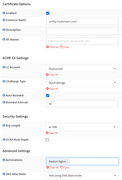
6. Go to Services -> ACME Client -> Certificates
Create a new Certificate
Enabled [X]
Common Name: emby.mydomain.com (change to your domain name!)
LE Account: MyAccount (select created name)
Challenge Type: MyChallenge (select created name)
Auto Renewal [X]
Key Length: ec-384
OCSP Must Staple: [ ]
Automations: Restart Nginx
Now save and press the button "Issue or renew certificate", wait a minute and refresh the page
You see "Last ACME Status = OK"
Part 4 - Nginx config
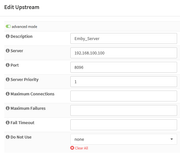
1. Go to Services -> Nginx -> Configuration -> Upstream -> Upstream Server
Create a new Upstream Server
Description: Emby_Server (or what you want)
Server: 192.168.100.100 (change to the local server IP hostet plex/emby or your service)
Port: 8096 (change to service port of plex/emby, recommended http not https port)
Server Priority: 1
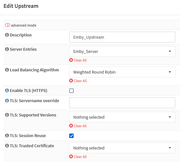
2. Go to Services -> Nginx -> Configuration -> Upstream -> Upstream
Create a new Upstream
Description: Emby_Upstream (or what you want)
Server Entries: Emby_Server (select your Upstream-Server)
Load Balancing Algorithm: Weighted Round Robin
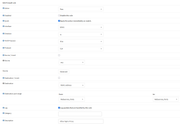
3. Go to Services -> Nginx -> Configuration -> HTTP(S) -> Location
Create a new Location
enable "advanced mode"
Description: Emby_Location
URL Pattern: /
Learning Mode: [X] (dont ban IPs, activate if you want)
Upstream Servers: Emby_Upstrem (select your Upstream)
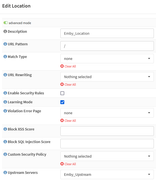
Advanced Proxy Options
WebSocket Support [X]
Proxy Read Timeout: 3600
Proxy Send Timeout: 3600
Response Buffering [ ]
Request Buffering [ ]
Maximum Temporary File Size: 4096
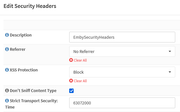
4. Go to Services -> Nginx -> Configuration -> HTTP(S) -> Security Headers
Create a new Security Header
Description: EmbySecurityHeaders
Referrer: No Referrer
XSS Protection: Block
Don't Sniff Content Type [X]
Strict Transport Security: Time: 63072000
5. Go to Services -> Nginx -> Configuration -> HTTP(S) -> HTTP Server
Create a new HTTP Server
enable "advanced mode"
Real IP Source: X-Forwarded-For
Server Name: emby.mydomain.com (change to your domain name!)
Locations: Emby_Location (select your Location)
Maximum Body Size: 200m
TLS Certificate: emby.mydomain.com (ACME Client) (select your created domain cert)
Client CA Certificate: R3 (ACME Client)
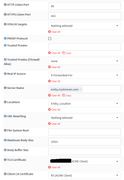
Enable Let's Encrypt Plugin Support [X]
HTTPS Only [X]
Disable Bot Protection [X] (recommended for Plex/Emby/Jellyfin)
Advanced ACL Authentication Backend: none
Enable Sendfile [ ]
Security Header: EmbySecurityHeaders (select your Security Header)
6. Now go to Services -> Nginx -> Configuration -> General Settings
Enable nginx [X]
Part 5 - Firewall rules
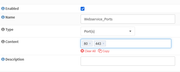
1. Go to Firewall -> Aliases
Create a new Aliase
Name: Webservice_Ports
Type: Port(s)
Content: 80, 443
2. Go to Firewall -> Rules -> WAN
Create a new Rule
Action: Pass
Protocol: TCP
Source: any
Destination: WAN address
Destination port range: Webservice_Ports
Log: [X] Log packets that are handled by this rule (Logging access in FW protocol if you want)
Description: Allow Nginx-Proxy
Finished!
1. Test your Site (Smartphone or other external internet connection)
2. If that works, test your certificate
Go to: https://www.ssllabs.com/ssltest/
and enter your domain. Wait until the test is finished.
Result: A+

Ideas, question or suggestions for changes? please post it
Primary testet for Plex / Emby / Jellyfin (or other services)
September 2021
Part 1 - WebGUI config
Go to System -> Settings -> Administration
TCP port: 8443 (change to what you want. don't use 80 or 443!)
HTTP Redirect: [X] Disable web GUI redirect rule (important!)
Part 2 - Install plugins
Go to System -> Firmware -> Plugins
Install plugins:
os-nginx
os-acme-client
Part 3 - Create Let's Encrypt certificate
1. Go to Services -> ACME Client -> Settings -> Settings
Enable Plugin [X]
Auto Renewal [X]
HAProxy Integration [ ]
2. Go to Services -> ACME Client -> Settings -> Update Schedule
Minutes: 45
Hours: 5
Days of the week: 1
3. Go to Services -> ACME Client -> Accounts
Create a new Account
Name: MyAccount (what you want)
E-Mail Address: my@mail.tld (your mail address)
ACME CA: Let's Encrypt [default]
4. Go to Services -> ACME Client -> Automations
Create a new Automations
Name: Restart Nginx
Run Command: Restart Nginx (OPNsense plugin)
5. Go to Services -> ACME Client -> Challenge Types
Create a new Challenge Type
Name: MyChallenge
Challenge Type: HTTP-01
Or use "DNS-01" if you need DynDNS service
HTTP Service: OPNsense Web Service
IP Auto-Discovery [X]
Interface: WAN
6. Go to Services -> ACME Client -> Certificates
Create a new Certificate
Enabled [X]
Common Name: emby.mydomain.com (change to your domain name!)
LE Account: MyAccount (select created name)
Challenge Type: MyChallenge (select created name)
Auto Renewal [X]
Key Length: ec-384
OCSP Must Staple: [ ]
Automations: Restart Nginx
Now save and press the button "Issue or renew certificate", wait a minute and refresh the page
You see "Last ACME Status = OK"
Part 4 - Nginx config
1. Go to Services -> Nginx -> Configuration -> Upstream -> Upstream Server
Create a new Upstream Server
Description: Emby_Server (or what you want)
Server: 192.168.100.100 (change to the local server IP hostet plex/emby or your service)
Port: 8096 (change to service port of plex/emby, recommended http not https port)
Server Priority: 1
2. Go to Services -> Nginx -> Configuration -> Upstream -> Upstream
Create a new Upstream
Description: Emby_Upstream (or what you want)
Server Entries: Emby_Server (select your Upstream-Server)
Load Balancing Algorithm: Weighted Round Robin
3. Go to Services -> Nginx -> Configuration -> HTTP(S) -> Location
Create a new Location
enable "advanced mode"
Description: Emby_Location
URL Pattern: /
Learning Mode: [X] (dont ban IPs, activate if you want)
Upstream Servers: Emby_Upstrem (select your Upstream)
Advanced Proxy Options
WebSocket Support [X]
Proxy Read Timeout: 3600
Proxy Send Timeout: 3600
Response Buffering [ ]
Request Buffering [ ]
Maximum Temporary File Size: 4096
4. Go to Services -> Nginx -> Configuration -> HTTP(S) -> Security Headers
Create a new Security Header
Description: EmbySecurityHeaders
Referrer: No Referrer
XSS Protection: Block
Don't Sniff Content Type [X]
Strict Transport Security: Time: 63072000
5. Go to Services -> Nginx -> Configuration -> HTTP(S) -> HTTP Server
Create a new HTTP Server
enable "advanced mode"
Real IP Source: X-Forwarded-For
Server Name: emby.mydomain.com (change to your domain name!)
Locations: Emby_Location (select your Location)
Maximum Body Size: 200m
TLS Certificate: emby.mydomain.com (ACME Client) (select your created domain cert)
Client CA Certificate: R3 (ACME Client)
Enable Let's Encrypt Plugin Support [X]
HTTPS Only [X]
Disable Bot Protection [X] (recommended for Plex/Emby/Jellyfin)
Advanced ACL Authentication Backend: none
Enable Sendfile [ ]
Security Header: EmbySecurityHeaders (select your Security Header)
6. Now go to Services -> Nginx -> Configuration -> General Settings
Enable nginx [X]
Part 5 - Firewall rules
1. Go to Firewall -> Aliases
Create a new Aliase
Name: Webservice_Ports
Type: Port(s)
Content: 80, 443
2. Go to Firewall -> Rules -> WAN
Create a new Rule
Action: Pass
Protocol: TCP
Source: any
Destination: WAN address
Destination port range: Webservice_Ports
Log: [X] Log packets that are handled by this rule (Logging access in FW protocol if you want)
Description: Allow Nginx-Proxy
Finished!
1. Test your Site (Smartphone or other external internet connection)
2. If that works, test your certificate
Go to: https://www.ssllabs.com/ssltest/
and enter your domain. Wait until the test is finished.
Result: A+
Ideas, question or suggestions for changes? please post it